Keto Cheese Chip Nachos with Rotisserie Chicken

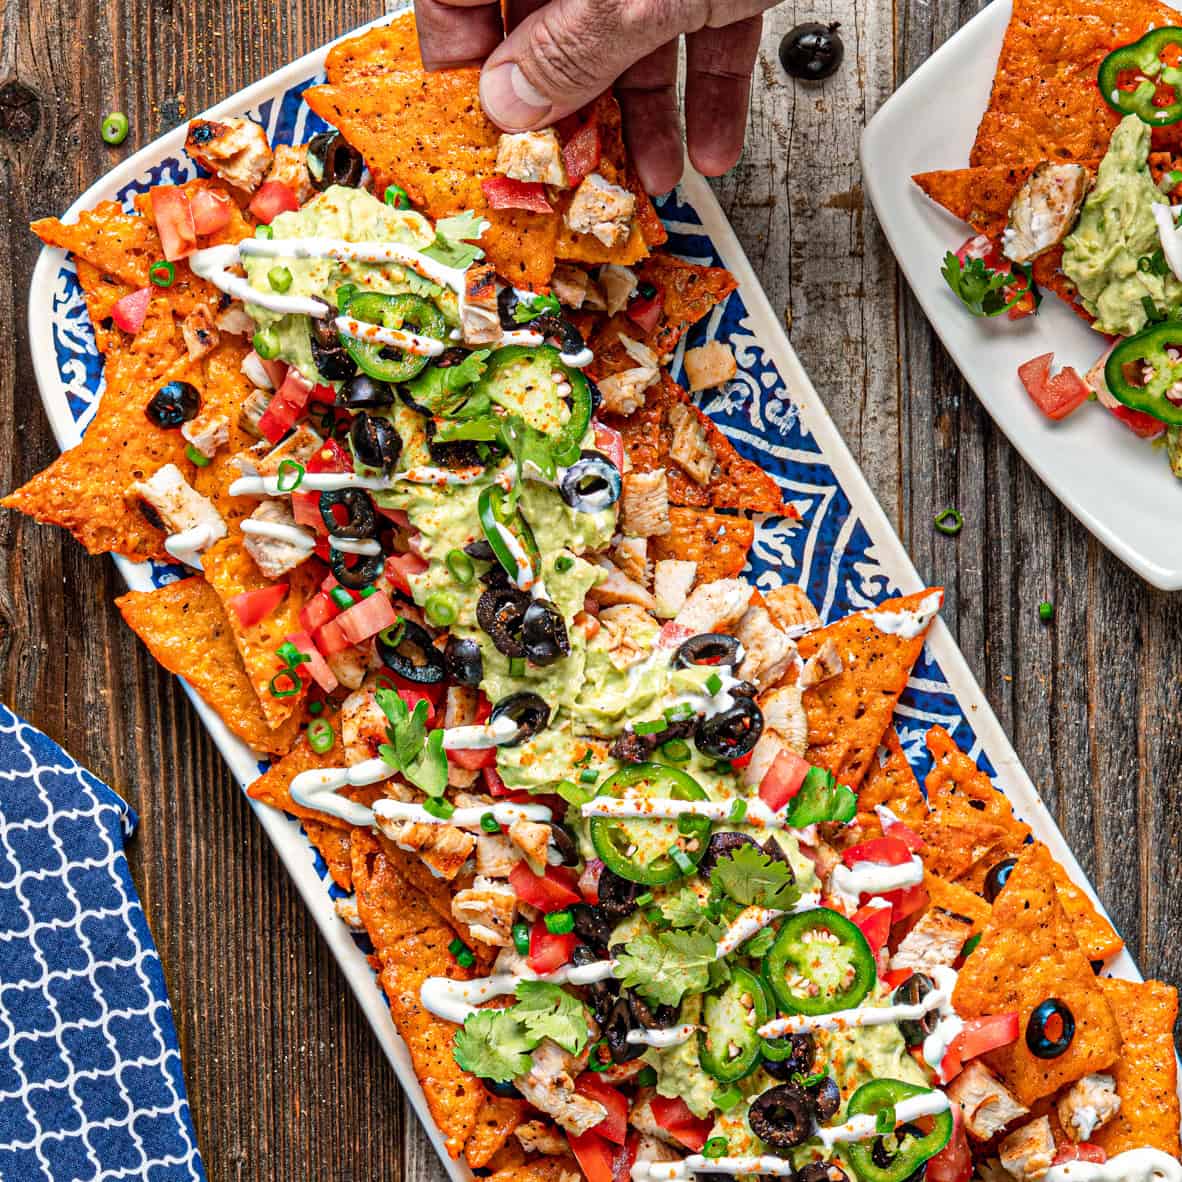
Keto Cheese Chip Nachos with Rotisserie Chicken
The tortilla chip is the weakest link in most nacho builds. It goes soft fast, it’s got no flavor of its own, and if you’re cooking low-carb, it’s the first thing you’re cutting anyway.
Low-carb without a sad plate is one of the harder problems our game day recipes take on.
These keto cheese chip nachos fix that. The base is a sheet of sharp cheddar and finely grated Parmesan, spread thin on parchment and baked at 400°F until the edges go golden. Once it cools, you peel it, cut it into triangles, and hit it under a high broiler for 60 seconds. What comes out snaps. It has pull. It tastes like cheese because it is cheese.
The cheddar handles the body and the fat. The Parmesan adds crispness and browning. Together they make a chip that outperforms any keto tortilla substitute on the market.
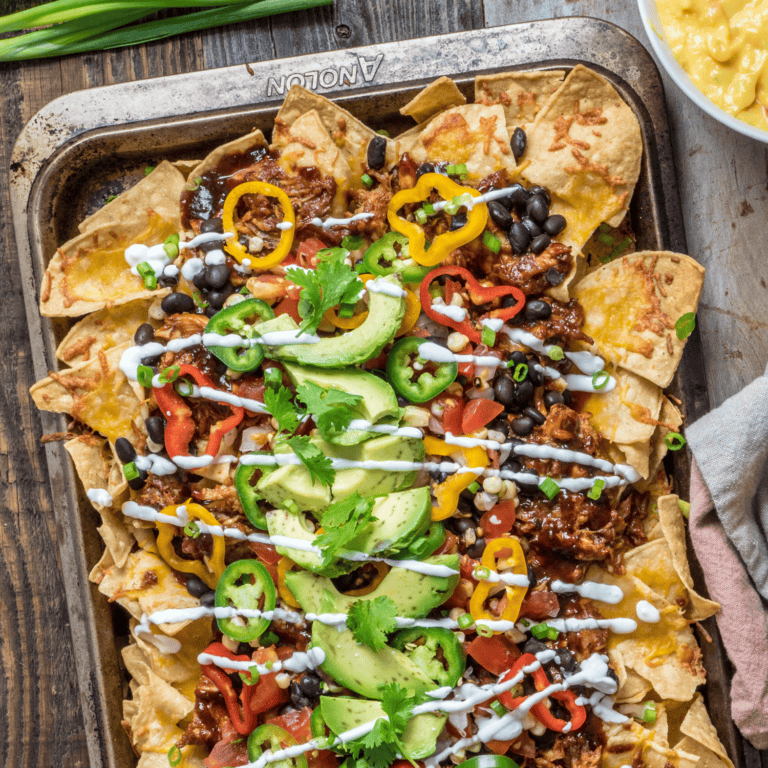
Load it with shredded rotisserie chicken, one bird from the grocery store covers the whole platter, then guacamole, sliced jalapeños, diced tomato, black olives, green onion, and sour cream. Six grams of carbs per serving. Twenty-eight grams of protein.
The technique is straightforward but timing is non-negotiable. Bake the cheese for 8-10 minutes. Wait 10 minutes for it to firm. Cut, broil, wait another 30 minutes. The crispness isn’t built in the oven, it’s built in the cooling. Skip either rest and you get a chip that bends instead of snaps.
Assemble at the last minute. The cheese base holds up better than a corn chip under toppings, but moisture wins eventually. Build it, bring it out, eat it.
This is the keto nacho you actually want to make, not because it’s a workaround, but because the chip is better.
Flavor First.
Keto Cheese Chip Nachos with Rotisserie Chicken
Ingredients
Equipment
Method
- Preheat oven to 400°F.
- Line a baking sheet with parchment paper or a silicone baking mat (this makes removal much easier).
- Sprinkle the shredded cheddar cheese in a thin, even layer across the entire prepared baking sheet, covering it evenly.
- Sprinkle the grated Parmesan cheese evenly over the cheddar layer.
- Place the baking sheet in the preheated oven and bake for 8-10 minutes, watching closely. The cheese should be melted and just beginning to turn golden around the edges. Don’t walk away—timing is crucial here.
- Remove from oven and let the melted cheese cool on the baking sheet for exactly 10 minutes. The cheese will firm up and become crispy as it cools.
- Once cooled, carefully peel the entire sheet of cheese off the parchment and onto a clean surface.
- Using a sharp knife or kitchen shears, cut the cooled cheese sheet into 2-inch strips, then cut those strips into triangle shapes like tortilla chips.
- Transfer the cheese chip triangles back to the parchment-lined baking sheet.
- Place under a high broiler setting for 1-2 minutes, watching very closely, to add extra crispness and additional color. The chips should be golden and crispy. Remove immediately—they can brown quickly.
- Let the chips cool for at least 30 minutes on the baking sheet to allow them to crisp up further.
- Transfer the crisped cheese chips to a serving platter.
- Warm the shredded rotisserie chicken (microwave for 1-2 minutes or warm in a skillet) and season with salt and pepper if desired.
- Top the cheese chips generously with warm rotisserie chicken.
- Arrange dollops of fresh guacamole across the platter.
- Add sliced jalapeños, diced tomatoes, sliced olives, green onion, and small dollops of sour cream across the platter.
- Garnish everything with fresh cilantro.
- Serve immediately for maximum crispiness.
Nutrition
Notes
- Cool completely, twice — The first 10-minute rest after baking sets the structure. The 30-minute rest after broiling builds the snap. Both are non-negotiable. Crispness comes from cooling, not the oven.
- Stay at the oven — Cheese goes from golden to scorched in under a minute under the broiler. Set a timer for 60 seconds and watch through the oven window the whole time.
- If the chips bend, pull back the bake time — Fragile chips that crack or fold usually overbaked on the initial round. Knock 1-2 minutes off the first bake next time.
- One rotisserie chicken is plenty — A whole bird yields about 3 cups of shredded meat. You need 2 cups here — the rest goes to lunch tomorrow.
- Build the base 2-3 days early — The cheese chips hold well in an airtight container at room temp. Don’t refrigerate — moisture kills the crispness. Add toppings right before serving.
- Set these out on a wide platter for game day — the flat format lets everyone reach in from every side. A nacho bar works well here: chips on the platter, toppings in small bowls on the side so guests build their own. It keeps the base crispy longer.
- For a weeknight dinner, scale down and serve alongside a simple salad dressed with lime vinaigrette. The chicken and guac carry the protein and fat; the salad adds the green.
- If you’re pouring drinks, a cold Mexican lager or a mezcal margarita on the rocks is the right call. The salt in the chips and the bitterness in the beer are a natural pair.
- Keep the cheese chips and toppings separate until you’re ready to serve. Chips hold at room temperature in an airtight container for 2-3 days — don’t refrigerate them, or they’ll absorb moisture and go soft.
- Store the chicken, guac, jalapeños, tomatoes, and other toppings covered in the fridge for up to 24 hours. Guacamole is the most time-sensitive — press plastic wrap directly onto the surface to slow oxidation.
- Assemble no more than 30 minutes before serving. Once the toppings hit the chips, the clock starts. Eat them while they’re crisp.
Tried this recipe?
Let us know how it was!Frequently Asked Questions
Can I make the cheese chips ahead of time?
Yes, bake and broil the chips up to 3 days ahead, then store in an airtight container at room temperature. Skip the fridge; moisture is the enemy. Add toppings right before serving.
What cheese works best for keto cheese chips?
Sharp cheddar gives you the flavor and the base. Parmesan adds crispness and browning. Shred from a block, pre-shredded cheese has anti-caking agents that can make chips gummy.
How do I keep keto nachos crispy?
Don’t skip the cooling windows: 10 minutes after baking, 30 minutes after broiling. And don’t load wet toppings more than 30 minutes before serving. The chip is sturdy, but moisture wins eventually.
Can I use a different protein?
Rotisserie chicken is the call here for speed and flavor. Grilled chicken thighs, carne asada, or chorizo all work. Keep the meat warm and pat it dry before loading, wet protein softens the base fast.
Are these cheese chips gluten-free?
Yes. Cheddar and Parmesan are naturally gluten-free, and none of the toppings in this build contain gluten. Check your packaged guacamole or sour cream labels if you’re strict about cross-contamination.
How do I know when the cheese chips are done baking?
Pull them when the edges just start to turn golden, not brown. The center will still look slightly underdone. It firms up during the 10-minute cooling window. Wait for the center to look done in the oven and the edges will burn.
More like this: Appetizer & Dip Recipes · Chicken Recipes · Kinder’s Recipes
One Good Recipe a Week
No spam, no life stories. A recipe worth cooking, in your inbox.